Thursday, September 30, 2010

That's my Shamey


This week, the last week of "Critter" month,  the girls at Shirley's 2 Girls asked me to make a card with "Best Furry Friend"  and the twist is to use Purple and Orange.  My kitty kat Shamus is orange and purple is my favorite color so that was an easy request  to take.  I just went looking for some purple paper.  Have you noticed that just about everything I post includes the phrase "I went looking for..."  Yeah, well, scrap stuff still doesn't have a place to call home.   I'll get around to that...eventually, but I digress. 
It's Twisted Thursday and as I said the twist is to use purple and orange.  Grab your favorite critter image and whip something up.  Enter your creation by linking it up on the Shirley's 2 Girl challenge blog and who knows, maybe you'll win.  Some body's gotta win.  Need more inspiration, the design team always have something great to show, so again, go check out the S2G blog for some idea.  Don't have a critter image, there's a link to the store on the challenge blog and you can find plenty of adorable digi images there.  And since they're digi it won't take long to get, you'll be printing and coloring in no time.
For my card I put my efforts into coloring the digi image with copics.  The dp is from DCWV Glitter Stack and the little piece of yellow card stock is a DCWV scrap.    The kitty has a little bit of orange stickles on him and the woman has a little bit of yellow stickles in her hair, like highlights.  The yellow stickles were also used for the flower centers.  Easy Peasy and pretty cute.  I love to make cards with lots of layers but I've been experimenting with getting back to simpler cards.   Quite frankly, I can't figure out which style I like better.  So what I've found out is that I just like the way homemade cards look, doesn't matter how intricate and fancy or how plain and simple, I like them all.

Now for those of you who are nosey like me, and you know who I mean, I'm posting a pic of the real Shamus and me.  Can you tell that he's trying to get away from me the card looks pretty much like the real kitty.  Now if I'd been thinking ahead I would have worn my purple tee shirt, that would have been perfect.

So here's the deets:
Stamp - Shirley's 2 Girls "Best Furry Friend" digital image
Ink - HP printer
Paper - dp DCWV  "Glitter Stack";  Georgia Pacific card stock for image; yellow scrap sc DCWV
Miscellaneous - copics, Prima flowers, stickles
 
Here's the challenges:
Shirley's 2 Girls - Critters, twist use Purple and Orange
Creative Card Crew - Bloomin' Marvelous - the more flowers the better (even my dp has flowers)

Thanks for stopping by, I hope you will come back again.

Wednesday, September 29, 2010

Friends


I whipped up this card, actually I whipped up six of them, using the Shirley's 2 Girls digital image called "friends".    My design team buddy Gina started a thread called "Spotlight Sunday" over on SNR.  Every other Sunday she's going to spotlight a different category of stamps to use in her challenge.  So for the first challenge all you need to do is use a stamp or digi from the "Attitudes" section.  
This image reminds me of my old work place.  I really miss all my buddies and need to send some notes out, that's why I made so many.   It was a lot of fun to color and while I was coloring I was remembering how much fun I had with the "gals".  Sometimes we'd go out for dinner, or we'd shop.  At lunch time we could run out for a mani-pedi.  Sometimes there were house parties.  We were close to NYC, half an hour away so it was easy to pop into the City to see a show and get a bite to eat.  And of course there was always just yakking during the work day.   I don't miss going to work so much as I miss seeing my friends...
So here's the deets:
Stamp = Shirley's 2 Girls digi "Friends"; sentiment Art Impressions
Ink - HP printer; CTMH cranberry for sentiment
Paper -pink  Warsau cs; Georgia Pacific cs for image
Miscellaneous - copics, Queen and Co pearls; Stampin' Up corner punch
Here's the challenges:
Spotlight Sunday - Use and S2G Attitudes image
Shabby Tea Room #29 -  Pearls and Pastels

Thanks for stopping by, I hope you''ll come back again.

She's Sassy

This week at Cooking it Up With Katie we're getting Sassy.  Well, we're being sponsored by Sassy Studio.    Most of us are pretty sassy all the time.  Katie always has a fun recipe to try, this week she wants you to use a digi image (hint, you can get a Sassy image), use yellow and sparkle. 
Yellow is always cheery on cards (not on me, I look awful in it).  So I paper pieced the chair with a yellow print, gave the sassy gal a yellow shirt and blond hair, and added some yellow bling for the sparkle. 
I really enjoyed this working with this image and I kept myself entertained trying to figure out what put that contented look on her face.  I don't think that cup of cocoa put that peaceful look on her.  I had a few idea but the one my twisted little brain settled on is that she just read the results off her EPT stick.  I'm not saying what the result is, but she sure does look relieved.  Remember, I'm easily amused.
Go visit Katie and make a card for her challenge.  Link it up there and you could win a prize.
So here's the deets:
Stamp - digi image "Cocoa" from Sassy Studio
Ink - HP printer; Ranger Scattered Straw
Paper - Best Occasions card stock; Stampin' Up "Delicate Dots" dp
Miscellaneous - Queen and Co Sunflower Yellow  rhinestones; Spellbinder's Labels 9 nestie; Sulky thread
Here's the challenges:
Cooking It Up with Katie - Yellow, sparkle and digi image
Crazy for Challenges C4C56 - Bling
Charisma Cardz #38 - Anything Goes

Thanks for visiting.  I hope you'll come back again.

Thursday, September 23, 2010

Halloween Lights

These  are the cutest  little Halloween decorations.  I can say that for sure because they are sitting on my dining room table looking absolutely adorable.  I'm using them as luminaria but you could use them as goodie bags for your favorite trick or treaters.  One of the best things about them is that you can make them for next to nothing and you can make them any size you want. You probably have a sandwich bag and you can pick up this image in the Shirley's 2 Girls store for next to nothing.  It's digital so you don't have to wait long to get it and when you get it you can make it as big as your printer will allow.   Imagine how cool it would be to use a bag from the food store with a huge image.

It's still Crittertime at Shirley's 2 Girls challenges.  This week the twist is "SPOOKY".    I was  asked to use the" Hallow Scream" digi image.  This is right up my alley.  The minute I saw that kitty I cracked up.  He's looking for trouble, I have seen this look on my cats and it is inevitably followed by a crash and some form of clean up.    It's such a cute and easy to work with image.  It would be great on a card or invitation.  It would also be nice as a pin, you can find directions to make the pin in the post below.

Take a good look at the photo, can you notice that the one on the right is colored slightly differently.  I did that on purpose.  Every now and then someone asks me about copic markers, which I happen to like.  But they are a bit of an investment because you can't have just one, and in the case of copics it's not about obsessiveness, in order to work with them you need a good selection of colors and that can get pricey. Tthe image on the bag on the right is colored with Prismacolor pencils.  I don't use OMS or Gamsol.  I just color with the pencils.  I think the bag with pencil coloring looks as good as the bags done with copics. Here you can see that you can get similar effects with both mediums.  So if you're like me you will be going out to get whichever you don't have.  Don't be surprised if you see me post something made with crayons.  I just like to slap down color.

Now go pick up your favorite coloring medium, get a digi image from S2G and make something spooky.  Need more inspiration, well go check out what the rest of the design team has done.  Don't forget to enter your creation for a chance to win a digi image.

Don't forget to join us over on SNR for some digi fun.

Thursday, September 16, 2010

A Happy Birthday pin

At  Shirley's 2 Girls  it's Twisted Thursday again.
birthday card with pin
This week the twist is birthday.   I'm sure you can use a birthday card for someone so why not make one and enter it in the challenge by linking it up on the Shirley's 2 Girls challenge blog.  You could win a couple digi images. 

The girls asked me to make something with the Domino's gift image.  It's such a cute image I was happy to oblige.

 Say hello to Domino, isn't she a good doggie!  If you love her as much as I do you can get the digital image here


inside of card with pin attached to cardstock popped up on dimensionals

So let's say you're strapped for cash  or you're just cheap and you  need a birthday card and present for your bestie best friend.  She knows you make cards, she probably loves everything you make and will be thrilled if you make her a present.  So how about a pin, you know costume jewelry.  Isn't that a dumb name, it's not a costume, that's for halloween.  This pin is something she can wear all year.  Of course you could make a pin for halloween,  just choose the appropriate image and follow the general idea of the instructions

So here's a lesson on how to make a pin using the S2G digi image "Domino's Gift".  You can click on any of the pictures and be able to see an enlarged image, but I didn't do a very good job of focusing. 

What you need

An image – If you choose to use a digital image you have the added benefit of making the pin in the size of your choice. Print out a few. You will use two images to make the pin and it’s always nice to have an extra image ready in case you are unhappy with something as you go along, such as a color choice (I’m sure you never make mistakes…) Sometimes I just make several of an image at the same time, especially at the holidays because they make great grab bag presents.

A small piece of black (or any color you like) card stock for the backing, this adds some stability and strength to the pin.

A jewelry pin, you can pick these up in most craft stores.  They come in different sizes and finishes.  I pick them up in small sizes because I usually make small pins.  The finish doesn't matter to me.
Coloring and decorative mediums. You can use pencils or markers. I’ve made these with copics as well as Stampin’ Up markers. Colored pencils will work. You may like to put sparkles on the pin which gives a nice effect (be careful a little goes a long way). Today I am going to use some stickles on the wreath/border aroud this image. (This image would be really cute for a Christmas present).   These directions include the numbers of the markers I used for this particular pin, but you can use any colors for yours.  If you're not sure how to substitute  colors,  pick colors that you like or pull colors from the designer papers you will be using to make the card.  Have a light and dard shade of each color, use the light color as the base color and shade with the darker one.

Glossy Accents (Ranger product) or Crystal Effects (from Stampin’ Up). I’ve used both products and they work exactly the same. I’ve never used UTEE but I’m told it works too

A plastic work mat or a piece of waxed paper is helpful – especially if you like the finish on your work table.

Time - Parts of the card require drying time, you can't rush this.  So don't wait to the last minute.  You can make this in a night, but you will need a few hours.  

Let’s get started.

When coloring it’s best to start with your lightest colors. For this pin the background is B000 Pale Porcelain Blue. Then color around the dog’s edges with B00 Frost Blue. I’ve gone over that edge a couple times to give it some definition. 

Color Domino with Y21 Buttercup Yellow, shade his left side with a thin line of Y26 Mustard. Go over the area where the colors meet this will provide a shaded look and eliminate the look of an outline. To make it look like a curly haired dog use a fine pointed marker to make some squiggley lines on his fur. For this doggie I used Stampin’ Up Mustard. Repeat this color scheme on a second face – this is the one that will show. The second face will be placed over the base one and will give it a little extra dimension.

Color the present with B01 Mint Blue and shade the lines with B02 Robin’s Egg Blue. Repeat this on the second image, again this is the one that will show.


affix the image to a slightly larger piece of cardstock
 Rough cut the image and glue it to a piece of black card stock and then cut it out. You don’t have to go crazy cutting out the uneven edge you can cut it out with a circle punch or some other cutting tool. Of course if you do cut out the uneven edge, it doesn’t have to be perfect. No one will know what it’s supposed to look like ‘cept me, and my lips are sealed. Iin my case I do have to cut out the uneven edge the way it was designed as perfectly as possible (I recognize my illness, and if you have to do it perfectly I understand)  Cut out the second face and present.  PUT THEM WHERE YOU WILL FIND THEM.  They are little and will disappear on your desk if you don't make them stay in a special spot. 

If you like to sign your work, now would be a good time to do it. Flip over the base image, keep in mind that you will be adding a pin to the back and sign it in a place that won't be covered by the pin.

Place stickles on the large white dots on the wreath. I used turquoise stickles, I like the way they look put they don’t stand out a lot so think about that when picking the color you will use. Now put this on the side and let it dry. Stickles WILL make a mess if they get a chance, so let it dry. Use the time to make the card you’re going to give with the pin.  

Once the stickles are dry you are ready to put on the second face and gift bag. This is when you will want to be using a plastic work surface or waxed paper.  Go find the face and bag (did you put them where you could find them or did you let them take a walk, if they're walking now would be a time those extra prints would come in handy)  Starting with the face and gift bag spaces cover the image with a thin coat of Glossy Accents. Put the cut out pieces on top of their base images and cover the second image with Glossy Accents.  There will be a just a little space and even though it's very thin, that little space does add something positive to the overall appearance.  Use the tip of the bottle to spread the liquid around.  Continue covering with the Glossy Accents until the entire surface is covered.  This would be the time to put on the clear sparkle, remember if you do use them, use them sparingly.   If the Glossy Accents went over the edges when it is dry you’ll be able to gently pop it off of the waxed paper or plastic sheet  without damage to the pin or your table. Again you will need to let it dry, it takes at least an hour, depending on how thick you put on the Glossy Accents.   If you already made the card, now you could make a little box for it, or a gift bag. 


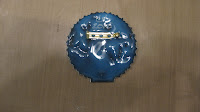
When the front is dry flip it over and coat the back with Glossy Accents. Place the pin on top of the Glossy Accents, in the center about an inch from the top. Allow to dry.  In this photo the Glossy Accents have just been applied, they'll even out a little as it sits and they will dry clear.

Once it's dry your pin is ready to wear or give away.

I hope these directions were clear, please let me know if something didn't make sense.

Here's the deets:
Image - Shirley's 2 Girls "Domino's Gift" digi image
Ink - HP printer
Paper - for the card base SU kraft; scrap of black card stock; Georgia Pacific for the image; dp DCWV the Pet's Stack
Miscellaneous - Copics; jewelry pin; Crystal Effects; stickles; May's ribbon; TCP twine; charm; Michael's rhinestone stickers

Thanks for visiting, I hope you'll come back again.

Wednesday, September 15, 2010

A Fancy Fold


Yikes a fancy fold!  This week the recipe challenge at Cooking It Up With Katie is to  use a fancy fold, autumn and embossing.  I don't usually bother to do anything more than a simple fold so this was a real challenge for me.  A long time ago I made a card with a swinging piece and I loved the way that looked so I went back through my blog to find it because I knew I put a link to the directions in the post.  Yeah me!  I won't make you go back to look for it, I'll just give you this link to the directions.  Turns out that making a "flip flop" card is pretty easy and the real challenge for me was the embossing.    I adjusted the size of the card a little so that the image would fit in the piece that flips but otherwise I followed the directions in the Splitcoast tutorial (that's where the link will take you).   The two small pictures show you what the card looks like when it's laid flat.  This type of card makes a great invitation, where I've put the sentiment you would put the party details. 
If you've been following me you know that I recently moved and that I don't have a crafting space in my new house.  I'm hoping to get something together somehow in the future but for now my supplies are all over and I'm working on my kitchen table.  So it's time to emboss and I can't find any embossing folders.  Dang nabbit, so I figured I'd just find a stamp and emboss it, I do love the way gold embossing looks, and it would be nice to emboss some leaves for autumn.  Hmm, first finding my leave stamps, not working out for me, so I looked for a background stamp.  Found the Hero Arts "Manuscript Background"  and couldn't find my gold powder.  ACK!  I found lilac, turquoise, clear, red and silver, none of which I cared to use.  Then I found yellow!  Wohoo!  I sat down and got ready to play and realized I didn't know where my heat gun was.  This meant a trip to the sauna, otherwise known as my garage to look for unopened boxes of craft supplies.  Twenty minutes later I emerged dripping wet with heat gun in hand and stamped the background with Versamark applied the powder and heated it up.  Well, it doesn't show in the pic, and it's not as evident as the gold would have been but it is embossed. 
In the end I pulled the card together, it may not be my best effort but I bet someone who doesn't read my blog, will think this card is absolutely adorable. 
Don't forget to visit Katie's blog to see what the rest of the Design Team did, you'll get some ideas for different folds, and maybe you'll enter the challenge and win a prize.

Here's the deets:
Stamp - C.C. Designs Baby Tricks or Treats Pumpkin; Sentiment, A Muse "Got Candy"; Hero Arts "Manuscript Background"
Ink - Versamark for the embossing, orange SU marker for the sentiment, Memento Tuxedo Black for the image
Paper - MFT Perfect Panel for images, SU Kraft for card base
Miscellaneous - yellow embossing powder; stickles; pumpkin charm; pumpkin button (shaft removed); TCP twine; copics

Here's the challenges:
Cooking It Up With Katie - Fancy fold, Autumn and embossing
Paper Sundaes #35 - use three types of embellishments (twine, charm and button)
Our Creative Corner - Fun with Folds
Raise the Bar Challenge #35 - Orange, brown and green
Paper Play Week 36 - Autumn is a Comin'

Thanks for visiting, I hope you'll come back again.  Would you please click on the pink ribbon before you leave.

Thursday, September 9, 2010

Critters Gone Wild!


****New Release Blog Hop!****

2G's DT is SALUTING the 'CRITTERS' in our lives...

be they furry, fuzzy or even fluffy!

The sisters are RELEASING ALL NEW DIGI Stamps that have to do

with our 'little 4-legged friends'.

Those sisters are going NUTS again with a fabulous BLOG CANDY package! Everything from ribbons to glitters!

We'll have 1 GRAND PRIZE WINNER of the blog candy and 3 critter digis & a 2nd place winner of 2 critter digis!

Here’s how to win….Grab your favorite furry friend and let’s go for a walk - Around the DT’s blogs! . . On the last stop you will be directed back to the S2G Challenge blog so you can leave us some love. The winners will be selected from the comments left on the Challenge Blog.

If you walked here from Georgia’s blog, then you’re in the right place. If not, head on back to the S2G Challenge blog  to start from the beginning. You don’t want to miss a thing!
**Don’t forget ** We also have our regular Twisted Thursday Challenge with the usual TWIST this week~ The TWIST this week is to use ...SPOTS & DOTS. Chances are better to WIN if you use a S2G DIGI or Clear Stamp. We'll also pick someone from this Challenge to Be a GUEST DT for a CUSTOMER BLOG HOP next month!

That's one big picture of my "Bosco Folder"  I made it big so that you could see I did use dots on my project, they're on the name on the bone.  The smaller pic is the card to go with it.   I picked up the folder for less than a buck at the local Wal-Mart (no weird shoppers for photo ops - unless you count me).  On the inside of the folder there are two pockets for your papers.  I thought this would be a pretty/fun place to keep the important information we all keep regarding our pets.  Bosco's owners like to take trips so this will be a good place to put the instructions for the pet sitter.

This image is Man's Best Friend.  One of the many critter digis available at Shirley's 2 Girls shop.   When I sat down to make this I knew I'd have a lot of fun because I love to make home interiors.  Can you tell that I like to do paneling?  It's very easy, I used to have all hard wood floors, one day I just looked at them and figured out that all you need to do to make a wood floor or panel is to draw lines, if you can't draw a straight line it's even better, and then put some dots around, I like to use colors that look like honey, put down a light color first and then just make some splotches of a darker tone.  It is as easy as I've just described.  Try it on a piece of scrap paper, you'll be surprised at how easy it is.  It's just time consuming which is fine by me.  Also for the lines make sure you use a fine point marker that won't smear when you color over it, that would be a drag.

The chair was paper pieced with dp from DCWV Pet Stack, all the dp used is from that pad.  For the bone, I fiddled around and just drew it, before I cut it out I checked to see if it was big enough for the name, it wasn't!  So I just drew a little more around it.  I show you this photo so you can see that I am not the most talented artist out there and you don't have to be to make little things like this bone (which if you make a little larger you could use as a template for a card - very cute to have a bone shaped card for your favorite pet lover).  The drawing is scratchy and imperfect but it looks pretty good on the folder.  What I'm saying is don't be afraid to try to do this stuff, it's not brain surgery, no one will suffer is you make a mess.  I plopped (very technical terminology used on this blog) the template on top of a scrap piece of card stock and cut it out, topped that on top of another darker piece of card stock (it's actually cut from the center of the mat around the image).  The dotted letters are rub-ons.  One suggestion, start with the middle letter and work your way out. 

Ready for your next stop on your walk…Then head on over to Lynne Gardine's blog  and hope you had fun while visiting here.
Lynne's our Guest DT, give her a big ole welcome and make her feel at home.
In case you get lost (being directionally challenged I tend to get lost all the time, even in blog land) here the Blog Hop Order….
1. Cat Darling
2. Georgia McDonald
3. Chris Veneruso (you are here)
4. Lynne Gardine
5. Ann English
6. Gina Lindsay
7. Laurel Seabrook
8. Mae Wisor
9. Melissa Oeters
10. Wendy Hoff
11. Debbie Daniels

There'll be lots of fun critter madness all along the way, these are some very talented ladies, you'll want to visit them all, in fact I'll be visiting too!

Here's the deets:
Stamp - Shirley's 2 Girls "Man's Best Friend" digi image
Ink - HP Printer
Paper - images printed on Georgia Pacific cs; dp DCWV Pet Stack; card base SU kraft cs; bone DCWV cs and scrap cs; blue mats on card SU Baja Breeze cs
Miscellaneous - charm; twill ribbon; stickles on dogs; copics; dimensionals; twine; Sweet Water rub-ons

Here's the challenges:
Shirley's 2 Girls - critters, twist use spots or dots
Mojo Monday #155 - sketch
Our Creative Corner - ABC's and 123's (BOSCO)
ABC Challenge - C is for charms
Color Throwdown #109 - Tempting Turquoise, Melon Mambo, Pear Pizzazz and Daffodil Delight (I think the chair alone has all those colors!)

Thanks for visiting, I hope you'll come by often.

Tuesday, September 7, 2010

Let's Go!


and if I'm saying "Let's Go!" it's usually followed by "Already!"  I'm so impatient when it's time to take off.  I just gotta hit the road, and I hate waiting around for people.  It's a bit rude but I am what I am and it's awfully late in the game for me to start changing but I'm giving it a try.  I'm going to try to adopt the leisurely pace that is prevalent here in the South.  Stay posted to hear how I'm doing.
I made this card using the My Favorite Things Wednesday Stamp Club sketch challenge.  Another one of my plans is to do all of the sketches that Frances and Cyndy have created.  It's not like I have anything more important to do.  hmmmm.

Here's the deets:
Stamp - My Favorite Things PI "Are We There Yet?"
Ink - Memento Tuxedo Black and Close to My Heart Desert Sand brushed around the image panel
Paper - Georgia Pacific cs for the image; SU cs scraps; dp K & Co "Itsy Bitsy Baby Boy" pad
Miscellaneous - TCP twine; Michael's Rhinestone Stickers; SU border punch; charms

Here's the challenges:
Wee Memories - Wee Ones
Stampin' Bee #74 - Charms

Thanks for stopping by, I hope you'll come back again.  Please click on the pink ribbon before you leave.

Thursday, September 2, 2010

Woof!

Ruff-ly (pun intended) translated "Woof!" means "nice hat!"  This little poochie image is "Domino Amused" and if you'd like to bring him home, you can find him  here at Shirley's 2 Girls.  He reminds me of Riley.  A very friendly Airedale (how the heck do you spell that breed?) doggie who I used to run into from time to time.  He was just as cute as Domino but he didn't have the hat. 

This month the theme for the S2G challenges is going to be all about our furry friends, 4 legged critters.  The girls have created some wonderful new images for us.  Were you one of the people who made a suggestion for a stamp?  Then you should see if your idea is there.  Do you love a furbaby, then you should go look, you will definitely relate.

This week the twist is to use flock or feathers.   I used some green flock to make his hat look like felt.  There are lots of other ways you can use flock.  At last year's CKC me and my crafting buddies (I miss you guys!) took a class on flock and they did a few things I never would have come up with, the one thing that comes to mind is they put glue on a  brad and covered it with yellow flock and used it as a flower center, the flock made the once metal brad look nice and velvety (is that a word?).  If you haven't worked with flock before may I recommend that you take it out of the bottle, put it in a larger container and fluff it up before you glue it down. 

For my project I altered a tea tin.  I was given this tin by someone who didn't want to toss it out and knew I'd make it into something.  You probably got a tin of tea or coffee or candy ( or something unspeakable) as a holiday gift from someone.  If you haven't eaten whatever's in it by now you probably won't so toss the stuff out and get cracking on making one of these.  Then you can regift without feeling guilty, I hear that's a new "green" cool thing to do.  In my day it was considered gauche and tacky to regift but I knew these people who were purposefully gauche and tacky, in a hysterical way.  Someone was always  regifting the same thrashy present to another one of them and that was pretty funny because no one knew when they were going to receive the plaster of paris wall ornaments from hell.  They had rules about how it could be done.  Fortunately I wasn't part of the inner circle, they were all school chums, I knew a couple of them, so I could never be the recipient, but I was fortunate enough to see how lovely they didn't look in a couple apartments.  Oh, they were fish, (ICK - fish, get it , fish - ICK- didn't you ever have tropical fish?) probably made in the sixties or fifties and they didn't go with any decor evah!  Maybe now they'd be fun in a kitchy kind of way, nah, who am I kidding, they'll always be butt ugly.  I'm sure these guys all still live in dread of receiving them - cause one of the rules was they had to be displayed for some period of time before they could be sent to someone else, and believe me, these guys checked to make sure they were up. 

I started to peel off the label off the tin and this is what it looked like after several painstaking minutes and then the light came on.  Besides I got a manicure today and there was no way I was going to ruin it when the label would get covered anyway, DUH.  Just cut out a piece of dp, slap the glue on it and wrap it around the tin,  easy peasy if you don't over think it like some idiot who shall remain nameless.  After you put your dp on it, you can put this cute poochie or which ever critter you like on it.  I put a piece of ribbon between the image and the mat and tied it around the tin so that I could hang the paw charm. 
I think you could fill this up with some doggie treats and give it to anyone doggie owner.
Need some more inspiration?  Head over to the Shirley's 2 Girls challenge blog and see what the rest of the design team has created.  They always have something worth seeing.  After you've made a card or project link it up on the challenge blog for your chance to win a digital image from S2G. 

Here's the deets:
Stamp - "Domino Amused" digi image from Shirley's 2 Girls
Ink - printed on my HP
Paper -  dp DCWV "Pet Stack" and a scrap of maroon card stock DCWV neutrals
Miscellaneous - green flock; ribbon, twine, charm; copics; white craft glue for flock

Here's the Challenges:
Shirley's Two Girls - theme is four legged critters, the twist is use flock or feathers.
Crafty Ho's - Use your school supplies (I used my trusty ruler and white craft glue - and no I didn't cover my hand with it and peel it off - at least not tonight - just got that manicure you know)
Cupcake Craft Challenge #106 - Let's Get Digital (does anyone else hear that little Aussie girl Olivia Newton John singing "Let's get digital, digital, I wanna get digital..." Oh that was "physical, physical", never mind - I really am old!)
ABC Challenge - C is for charms -  paw charm
Fab 'n Funky Challenges - Living in a Material World (love that song - cause I am a material girl) the ribbon

Thanks for visiting, I hope you'll come back again.  Before you leave, take the time to click on the pink ribbon - it's such a little thing to do, but if we all do it everyday, it'll be a great big thing.

Wednesday, September 1, 2010

My Furry Friend

Use a  furry friend, patchwork and button.  Leave it to Katie to come up with something to really challenge me.  The easiest part of this challenge was working with this image.  It's from Meljen's and you can find out all the details of how to get it on the Cookin' It Up With Katie challenge blog.  You'll also get to see what the rest of the design team did with the Meljen's images.  I got a sneak peek at them and one is cuter than the other. 
For this card I printed out the image on Georgia Pacific card stock and colored it with Copic markers.  I matted it with a piece of scrap and pounced around the edges with Ranger Tea Dye.  For the patchwork I cut up some October Afternoon "Thrift Shop" papers.  As a former quilter (maybe one day I'll take it up again) I can tell you that it's a heck of a lot easier and faster to make a paper quilt than a material one.  AND the math is a lot easier too.  AND I don't have that stabbing pain in my shoulder blades.  Hmmm, maybe I'll just let all those unfinished quilts remain as they are.
Here's the rest of the deets:
Stamp - digital image from Meljen's
Ink - printed on my HP; Ranger Tea Dye
Paper - white Georgia Pacific card stock; green scrap card stock; pink Colorbok card stock; dp October Afternoon "Thrift Shop"
Miscellaneous - TCP buttons and twine; ribbon; bear charm acharmingplace.com; Joy pearls
Here's the challenges:
Cooking it Up with Katie - a Furry Friend, patchwork and button
Shabby Tea Room Week #25 - Old Meets New (the pearls are old and the image is new - everything else is in between age)
Oh, Alice Chapter 28 - make a card with a little girl theme ( the floral dp reminds me of little girl dresses and every little girl has to own a teddy bear, that's probably a law in every part of the world)
Cupcake Craft Challenge #106 - Let's Get Digital
As always I am so grateful for all of your kind comments. I hope you'll come back again.  Will you please take the time to click on the pink ribbon before you leave, we really have to rid the world of breast cancer (and every other cancer) and even a little thing like a click helps get us there.
Blog Widget by LinkWithin